buy Stellar on Indacoin
Step by step overview on how to buy Stellar on Indacoin
Indacoin is a cryptocurrency exchange based in London, UK and has been serving the blockchain community since 2013. This platform offers both cryptos like Stellar and Fiat money transactions (except for Fiat money withdrawal via external wallet). Indacoin is also known to be the simplest platform to navigate as you have the option to buy over 100 different cryptocurrencies through credit/debit card payment without registration.
The steps below will serve as your guide should you wish to register an account on Indacoin.
- Sign-up for an account on Indacoin
- Verify your Indacoin account
- Secure your Indacoin account by setting 2FA
- Fund your Indacoin account
- Trade Stellar on Indacoin
1. Sign-up for an account on Indacoin
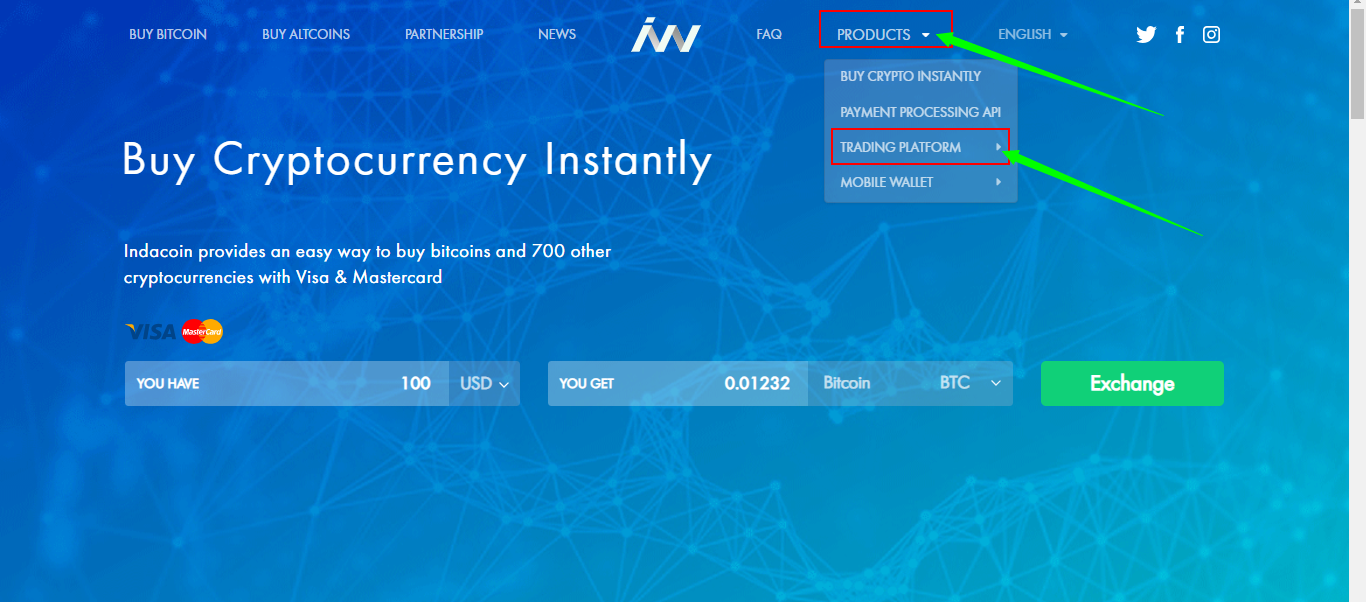
To register, open the Indacoin site and click on “Products” then “Trading Platform.”
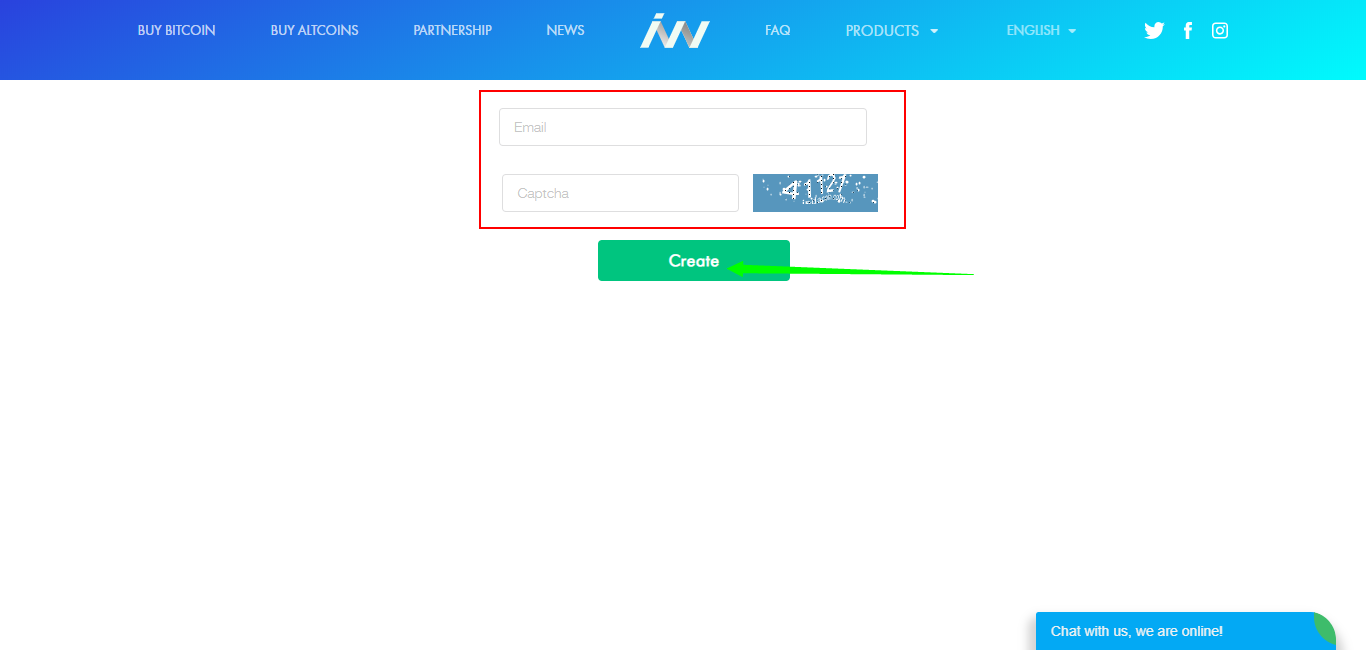
Type in your email address as well as the captcha provided by the system. Click on “Create” to continue.
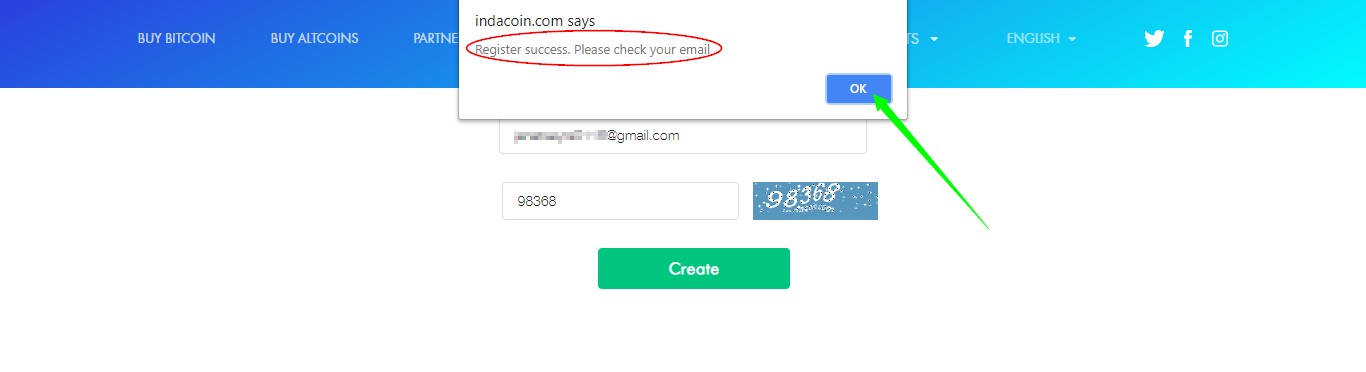
A small box will then pop-up confirming that the registration process has been processed. Click on “OK” and check your Inbox as instructed.
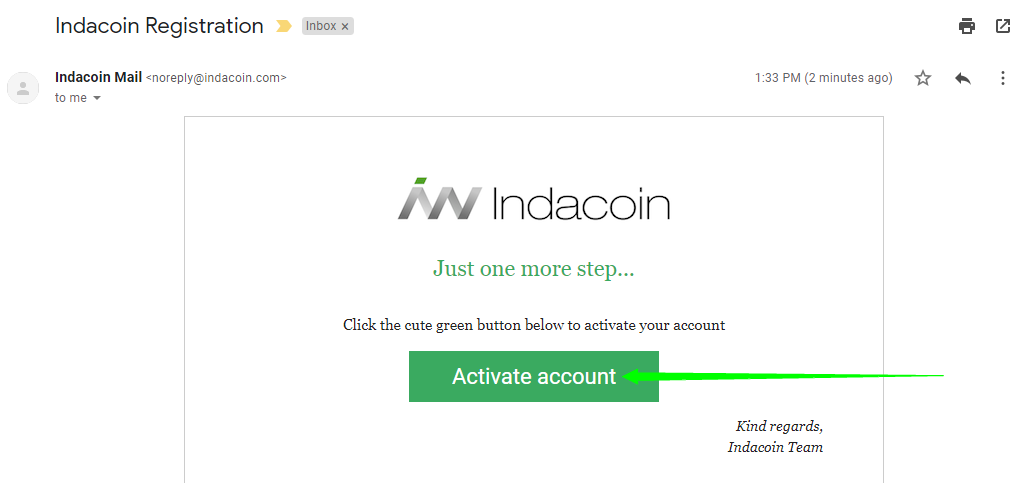
Locate the message sent from Indacoin and click on “Activate account.”
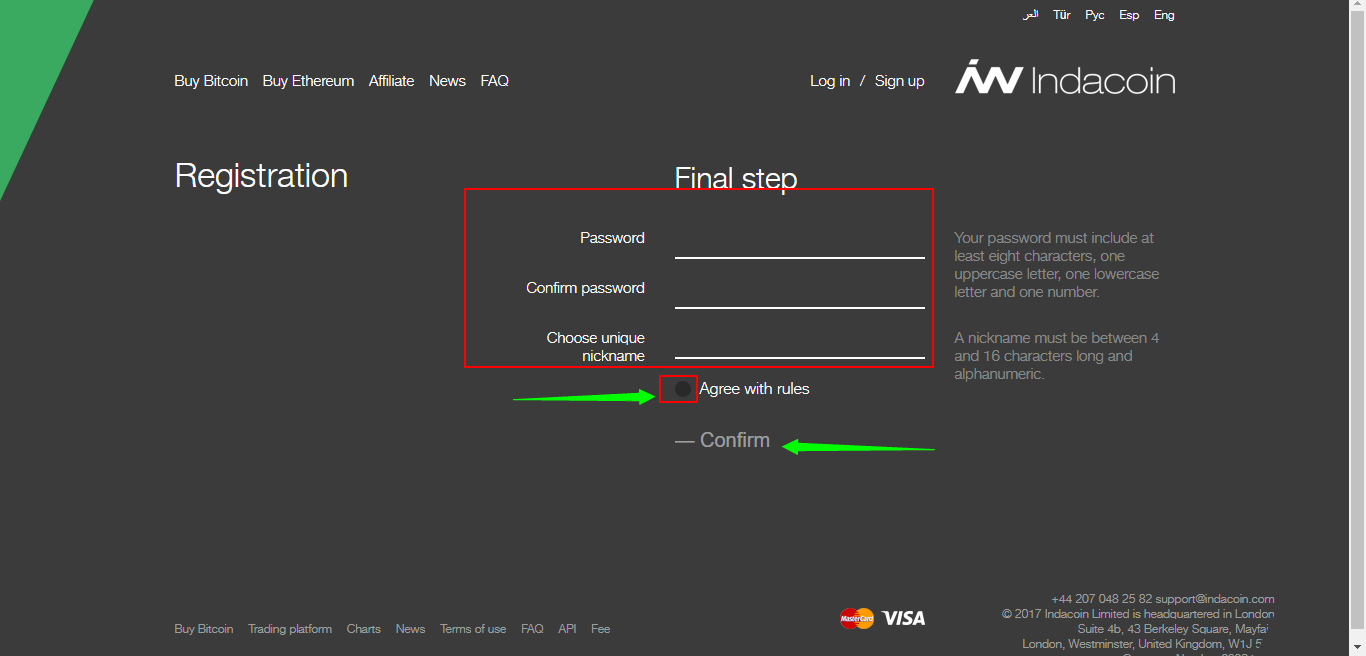
Finally, enter your password and confirm your agreement with Indacoin’s rules. Click on “Confirm” to continue.
 Easy, right? You have registered an account on Indacoin.
2. Verify your identity on Indacoin
Indacoin has two types of Verification process namely, phone verification and video verification. This can only happen when you are adding a credit card. Additionally, you only need to verify your card once and all following transactions will be automatic. However, Indacoin will require verification if you decide to use another bank card.
In the initial stage, you’ll be given a 4-digit code via phone call and you need to enter this code to confirm credit card ownership. The second stage may ask you to undergo video verification, where you record a video by showing your face and upload a scan or photo of your ID/Passport/Driver’s license. Depending on your verification, this step can be mandatory since Indacoin need to be certain that you are the cardholder.
If you are having trouble, you can send the required video as an attachment via e-mail to [email protected]. Make sure to indicate your exchange order number.
Perfect! You have verified your identity on Indacoin.
3. Secure your Indacoin account by setting a 2-factor authentication (2FA)
What is 2FA?
Two-factor authentication, also known as 2FA, is an extra layer of security or added protection which we refer to as multi-factor authentication. Not only the username and password are required but also a piece of information that only a user possesses. This process is to confirm a user’s claimed identity.
The 2FA process helps lessen the number of identity theft cases and as well as phishing via email. It would be harder for potential intruders to gain access and steal someone’s identity and personal data without that piece of information that only the account owner knows.
In the case of exchanges, what the user has are his/her login details such as the username and password. The form of 2FA that a user possesses for this instance is a token or code. The code can be received either through SMS on a user’s mobile phone or via applications like Google Authenticator or Authy.
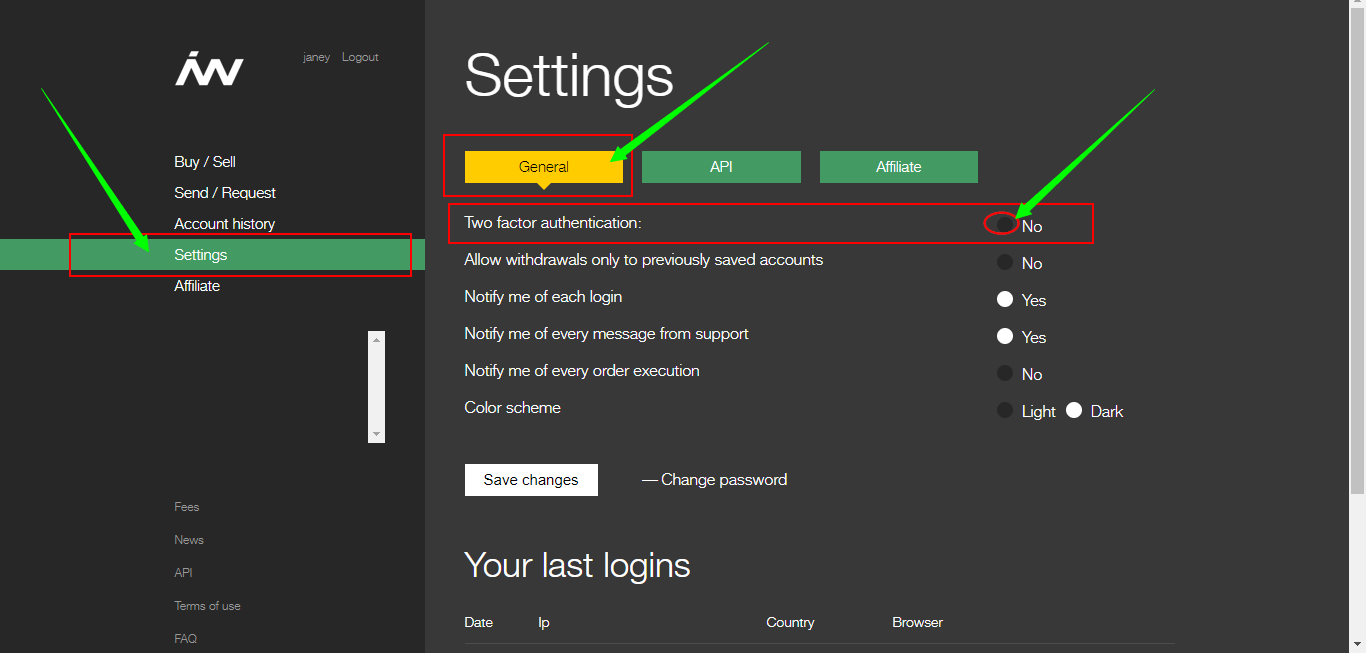
To activate 2FA on Indacoin, go to “Settings” and click on “General.” Beside Two-factor authentication, click the black circle to change it from No to Yes.
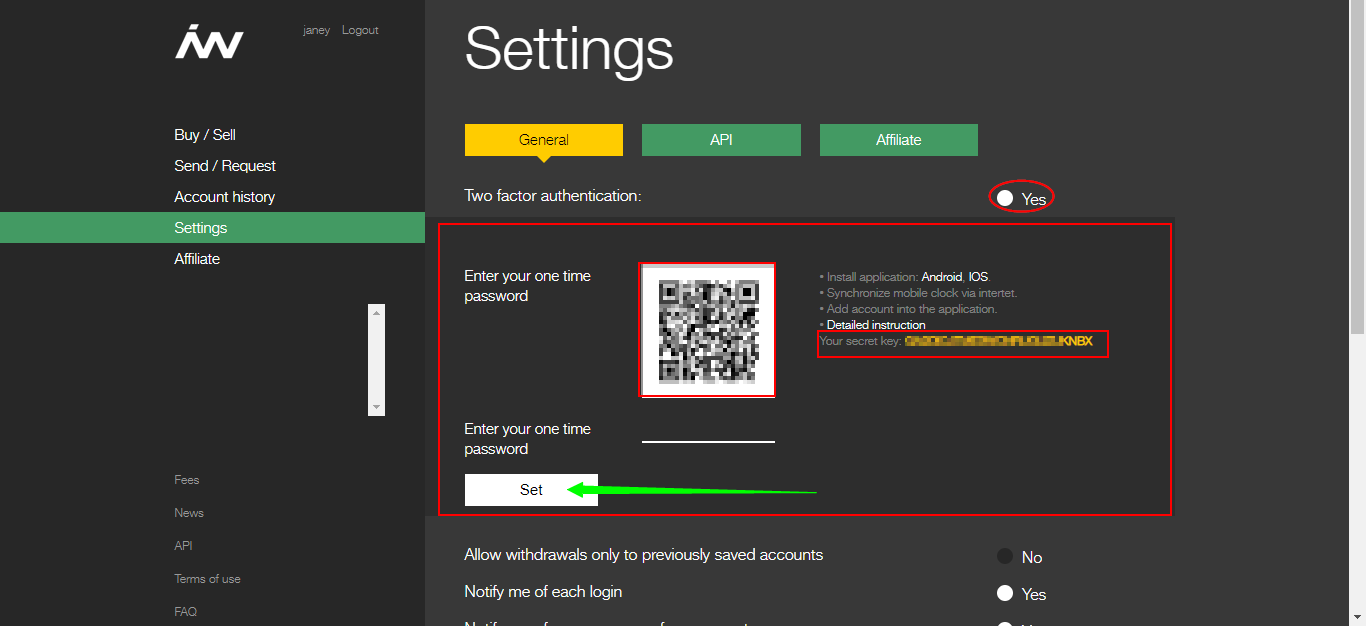
Scan the QR code or use the secret key to add an account. Scanning the QR code generates the 6-digit code that you need to enter. Click on “Set” to continue.
 Excellent! You have secured your Indacoin account.
4. Add funds on your Indacoin account
With Indacoin, you can deposit Stellar or Fiat money. Please take note that they use the term “Request” for deposit.
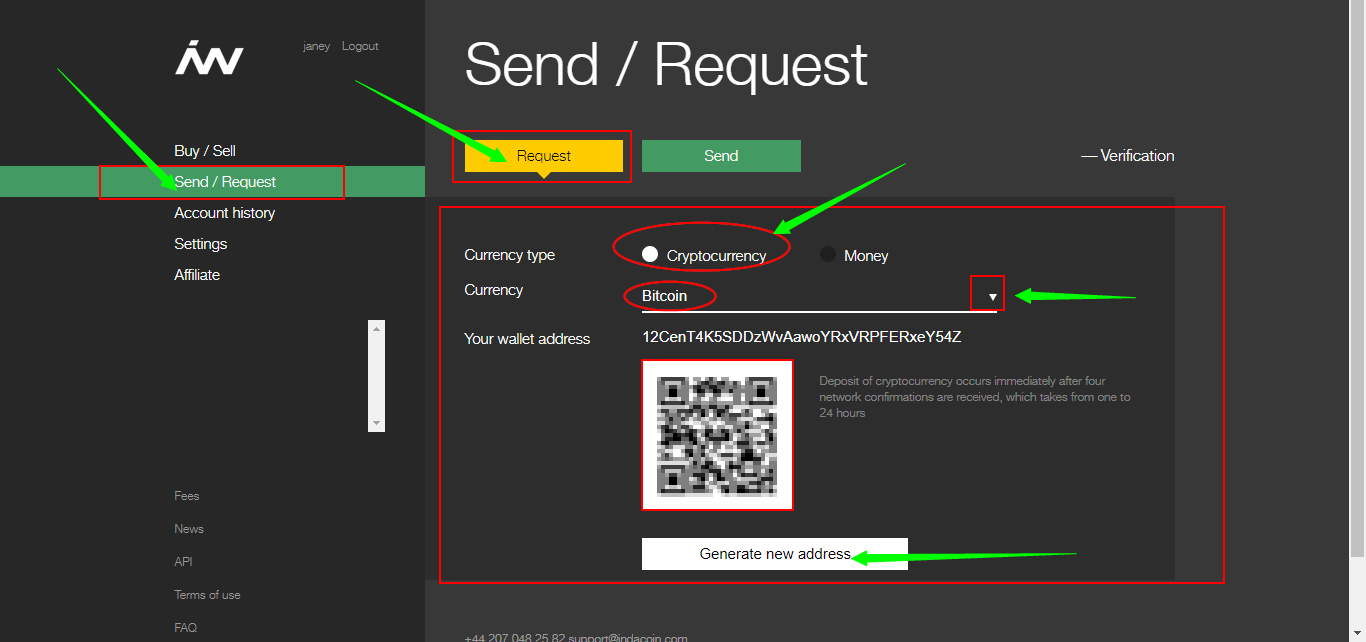
Go to “Send/Request” and click on “Request.” To deposit Stellar, select on “Cryptocurrency” and select your Stellar from the drop-down menu. You will then be given a wallet address. This is the address that you need to use in processing your Stellar deposit. You have the option to scan the QR code to generate a new one. Make sure that the correct address is used in processing your transaction to avoid losing funds.
For Fiat money deposit, select on “Money” and choose your currency from the drop-down menu. Since this step requires you to add a credit card, you need to go through Indacoin’s Verification process.
Once verified, click on “Deposit.”
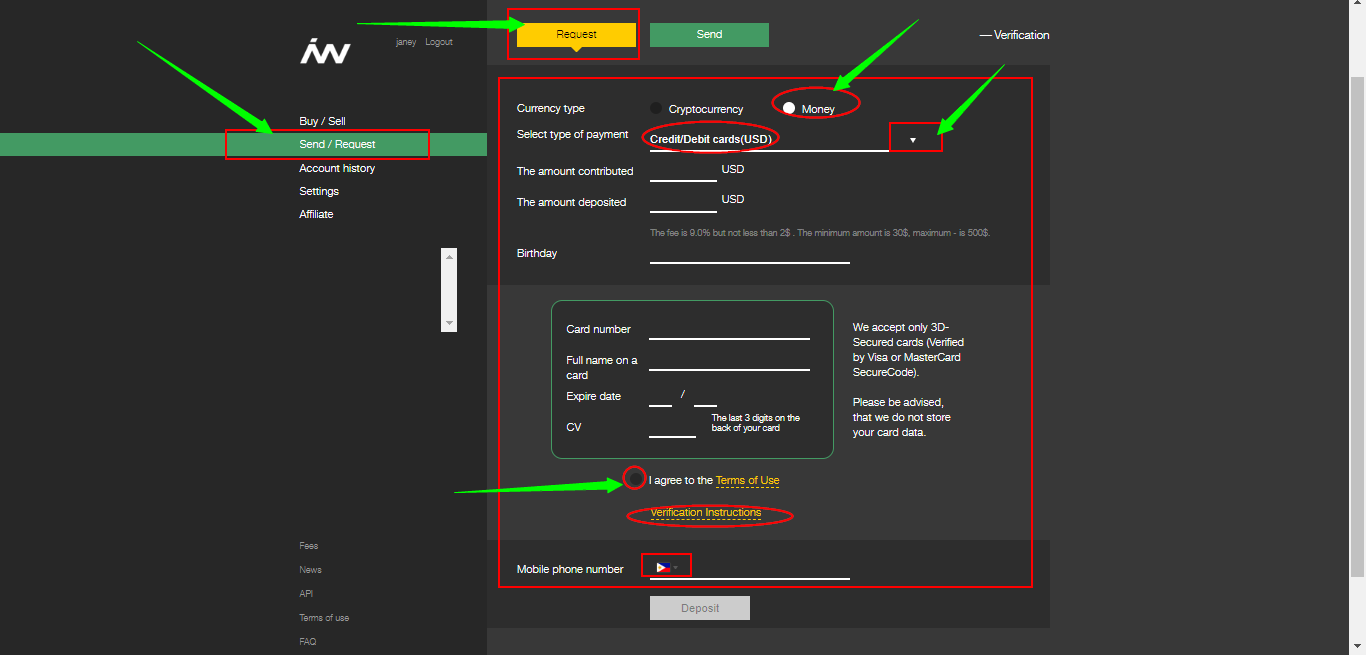
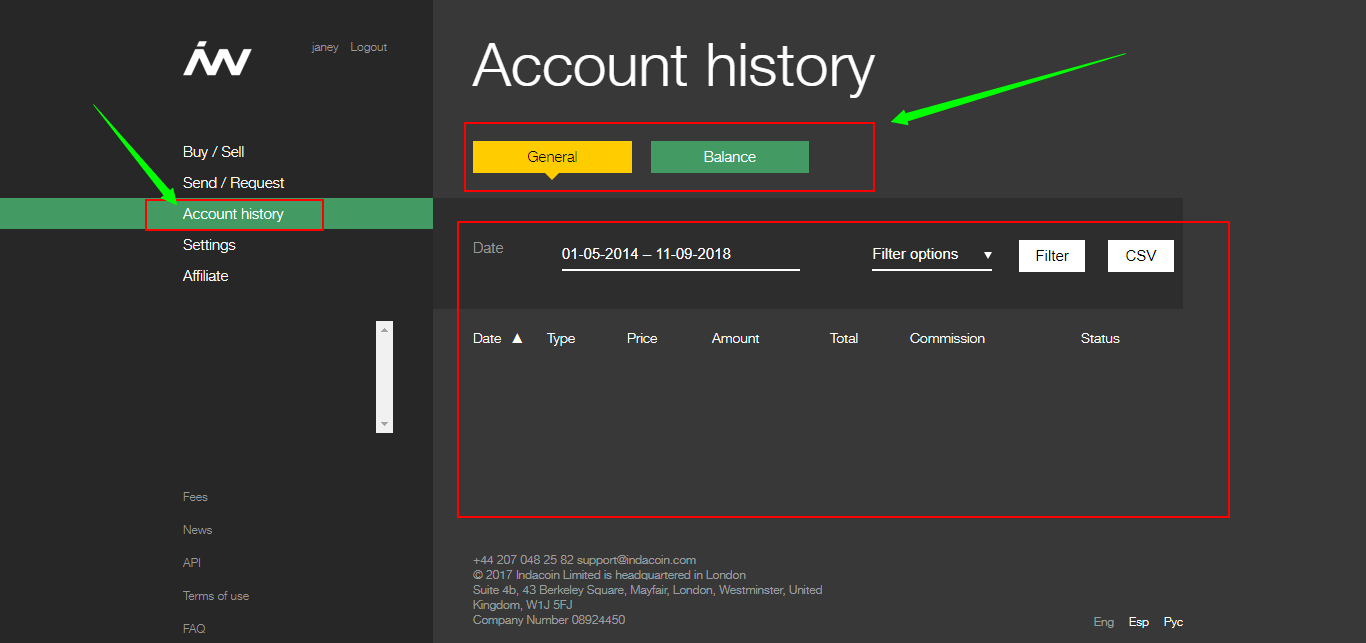
Recent and previous transactions can be viewed under “Account History.”
You did it! You have funded your Indacoin account.
5. Trade Stellar on Indacoin
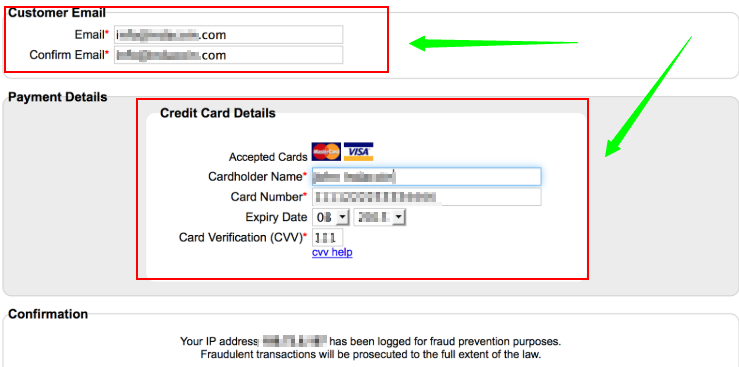
Unlike most exchanges, Indacoin does not require you to register an account to start buying Stellar. Simply click on your desired Stellar and fill out the form required by the system.
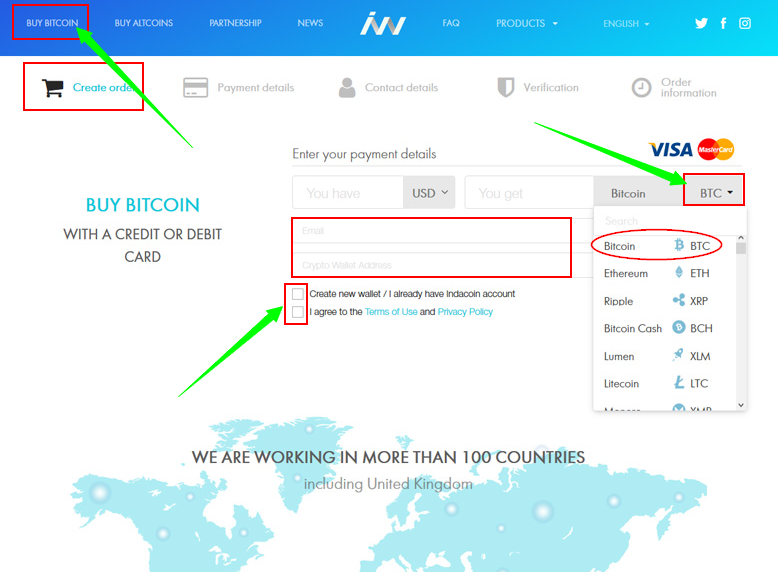
The idea is that you 1. create an order, 2. enter your payment details, 3. enter your contact details, 4. verify your identity confirming your credit card ownership, and finally, obtain your 5. order information.
 Congratulations! You have bought your first Stellar on Indacoin.
Transferring Stellar from Indacoin to other exchanges.
- How to transfer Stellar from Indacoin to EXMO?
- How to transfer Stellar from Indacoin to Bitstamp?
- How to transfer Stellar from Indacoin to GDAX (CoinBase Pro)?
- How to transfer Stellar from Indacoin to BCEX?
- How to transfer Stellar from Indacoin to Dragonex?
- How to transfer Stellar from Indacoin to Exrates?
- How to transfer Stellar from Indacoin to Dragonex?
- How to transfer Stellar from Indacoin to Coinone?
- How to transfer Stellar from Indacoin to itBit?
- How to transfer Stellar from Indacoin to CEX.io?
Transferring Stellar from Indacoin to wallets.
- How to transfer Stellar from Indacoin to BitBay?
- How to transfer Stellar from Indacoin to EXMO?
- How to transfer Stellar from Indacoin to Bitstamp?
- How to transfer Stellar from Indacoin to GDAX (CoinBase Pro)?
- How to transfer Stellar from Indacoin to BCEX?
- How to transfer Stellar from Indacoin to Dragonex?
- How to transfer Stellar from Indacoin to Exrates?
- How to transfer Stellar from Indacoin to Dragonex?
- How to transfer Stellar from Indacoin to Coinone?
- How to transfer Stellar from Indacoin to itBit?
- How to transfer Stellar from Indacoin to CEX.io?
Which Cryptocurrency do you want to buy, transfer or store?
How to buy Stellar on Indacoin
How to buy Stellar on other exchanges
Transfer Crypto Guides
List of all cryptos
- How To Buy 0chain (ZCN)?
- How To Buy 0x (ZRX)?
- How To Buy 0x Protocol?
- How To Buy 0xcert (ZXC)?
- How To Buy 12Ships (TSHP)?
- How To Buy 2GIVE (2GIVE)?
- How To Buy 3X Long Bitcoin Token (BULL)?
- How To Buy 3X Long BNB Token (BNBBULL)?
- How To Buy 3x Long EOS Token (EOSBULL)?
- How To Buy 3X Long Ethereum Token (ETHBULL)?
- How To Buy 3x Long XRP Token (XRPBULL)?
- How To Buy 3X Short Bitcoin Token (BEAR)?
- How To Buy 3X Short BNB Token (BNBBEAR)?
- How To Buy 3x Short EOS Token (EOSBEAR)?
- How To Buy 3X Short Ethereum Token (ETHBEAR)?
- How To Buy 3x Short XRP Token (XRPBEAR)?
- How To Buy 4NEW (KWATT)?
- How To Buy 8X8 PROTOCOL (EXE)?
- How To Buy Aave (LEND)?
- How To Buy ABBC Coin (ABBC)?
- How To Buy ABCC Token (AT)?
- How To Buy Absolute (ABS)?
- How To Buy Abulaba (AAA)?
- How To Buy Abyss Token (ABYSS)?
- How To Buy AC3?
- How To Buy Ace (ACE)?
- How To Buy Achain (ACT)?
- How To Buy Acoin?
- How To Buy Acute Angle Cloud (AAC)?
- How To Buy AdCoin (ACC)?
- How To Buy Adelphoi (ADL)?
- How To Buy AdEx?
- How To Buy adToken (ADT)?
- How To Buy Aelf?
- How To Buy Aeon (AEON)?
- How To Buy Aergo (AERGO)?
- How To Buy Aeron?
- How To Buy Aeternity?
- How To Buy Agoras Tokens (AGRS)?
- How To Buy Agrello (DLT)?
- How To Buy Agrolot (AGLT)?
- How To Buy AI Doctor (AIDOC)?
- How To Buy AidCoin (AID)?
- How To Buy Aidos Kuneen (ADK)?
- How To Buy AIDUS TOKEN (AIDUS)?
- How To Buy AiLink Token (ALI)?
- How To Buy Aion?
- How To Buy Airbloc (ABL)?
- How To Buy Airswap (AST)?
- How To Buy AirWire (WIRE)?
- How To Buy Aitheon (ACU)?
- How To Buy Aladdin (ADN)?
- How To Buy Alchemint Standards (SDS)?
- How To Buy Algorand (ALGO)?
- How To Buy All Sports (SOC)?
- How To Buy ALP Coin (ALP)?
- How To Buy Alphacat (ACAT)?
- How To Buy Alphacon (ALP)?
- How To Buy Alt.Estate token (ALT)?
- How To Buy Ambrosus (AMB)?
- How To Buy AMLT Token (AMLT)?
- How To Buy AMO Coin (AMO)?
- How To Buy Amon?
- How To Buy Ampleforth (AMPL)?
- How To Buy Amun Bitcoin 3x Daily Long (BTC3L)?
- How To Buy Amun Bitcoin 3x Daily Short (BTC3S)?
- How To Buy Amun Ether 3x Daily Long (ETH3L)?
- How To Buy Amun Ether 3x Daily Short (ETH3S)?
- How To Buy Angel Token?
- How To Buy Animation Vision Cash (AVH)?
- How To Buy Ankr (ANKR)?
- How To Buy Apex (CPX)?
- How To Buy APIX (APIX)?
- How To Buy apM Coin (APM)?
- How To Buy Apollo Currency (APL)?
- How To Buy AppCoins (APPC)?
- How To Buy Aragon (ARG)?
- How To Buy Arcblock (ABT)?
- How To Buy Ardor (ARDR)?
- How To Buy Ark?
- How To Buy ARPA Chain (ARPA)?
- How To Buy Artfinity (AT)?
- How To Buy Arweave (AR)?
- How To Buy Asch (XAS)?
- How To Buy ATB Coin (ATB)?
- How To Buy Atlant (ATL)?
- How To Buy Atlas Protocol (ATP)?
- How To Buy Atletico De Madrid Fan Token (ATM)?
- How To Buy ATMChain (ATM)?
- How To Buy Atonomi (ATMI)?
- How To Buy Attila (ATT)?
- How To Buy Auctus (AUC)?
- How To Buy Augur (REP)?
- How To Buy Augur (REP)?
- How To Buy Aunite (AUNIT)?
- How To Buy Aurora (AOA)?
- How To Buy Auroracoin (AUR)?
- How To Buy Authorship (ATS)?
- How To Buy Autonio (NIO)?
- How To Buy Aventus (AVT)?
- How To Buy Axial Entertainment Digital Asset (AXL)?
- How To Buy Azbit (AZ)?
- How To Buy B2Bcoin (BBC)?
- How To Buy B91 (B91)?
- How To Buy BaaSid (BAAS)?
- How To Buy BABB (BAX)?
- How To Buy Baer Chain (BRC)?
- How To Buy Balancer (BAL)?
- How To Buy Bananatok (BNA)?
- How To Buy Bancor (BNT)?
- How To Buy Bancor (BNT)?
- How To Buy Band Protocol (BAND)?
- How To Buy Barkis Network (BKS)?
- How To Buy BASIC (BASIC)?
- How To Buy Basic Attention Token (BAT)?
- How To Buy Bata (BTA)?
- How To Buy Beam (BEAM)?
- How To Buy Bean Cash (BITB)?
- How To Buy BEAT (BEAT)?
- How To Buy BeautyPayCoin (BPC)?
- How To Buy Becaz (BCZ)?
- How To Buy BeeKan (BKBT)?
- How To Buy Beetle Coin (BEET)?
- How To Buy Beldex (BDX)?
- How To Buy BENCOIN (BEN)?
- How To Buy BenePit Protocol (BNP)?
- How To Buy BetProtocol (BEPRO)?
- How To Buy BettingWin (BTW)?
- How To Buy Bezant (BZNT)?
- How To Buy Bezop (BEZ)?
- How To Buy Bhotspot (BHT)?
- How To Buy BHPCoin (BHP)?
- How To Buy Bibox Token (BIX)?
- How To Buy BidiPass (BDP)?
- How To Buy BigBang Core (BBC)?
- How To Buy BigONE Token (ONE)?
- How To Buy BIKI (BIKI)?
- How To Buy Binance Coin (BNB)?
- How To Buy Binance GBP Stable Coin (BGBP)?
- How To Buy Binance KRW (BKRW)?
- How To Buy Binance Token?
- How To Buy Bionic (BNC)?
- How To Buy Birdchain (BIRD)?
- How To Buy Bispex (BPX)?
- How To Buy BitBay (BAY)?
- How To Buy Bitblocks (BBK)?
- How To Buy Bitbook Gambling (BXK)?
- How To Buy BitCapitalVendor (BCV)?
- How To Buy Bitclave (CAT)?
- How To Buy Bitcloud Pro (BPRO)?
- How To Buy bitCNY (BITCNY)?
- How To Buy Bitcoffeen (BFF)?
- How To Buy Bitcoiin (B2G)?
- How To Buy Bitcoin?
- How To Buy Bitcoin BEP2 (BTCB)?
- How To Buy Bitcoin Cash?
- How To Buy Bitcoin CZ (BCZ)?
- How To Buy Bitcoin Diamond (BCD)?
- How To Buy Bitcoin Free Cash (BFC)?
- How To Buy Bitcoin God (GOD)?
- How To Buy Bitcoin Gold?
- How To Buy Bitcoin Interest (BCI)?
- How To Buy Bitcoin Private?
- How To Buy Bitcoin SV (BSV)?
- How To Buy Bitcoin Token (BTK)?
- How To Buy Bitcoin Vault (BTCV)?
- How To Buy BitcoinHD (BHD)?
- How To Buy BitcoinPoS (BPS)?
- How To Buy Bitcoinus (BITS)?
- How To Buy BitcoinV (BTCV)?
- How To Buy BitcoinX (BCX)?
- How To Buy BitcoinZ (BTCZ)?
- How To Buy Bitcrystals (BCY)?
- How To Buy Bitex Global XBX Coin (XBX)?
- How To Buy BitForex Token (BF)?
- How To Buy BitGuild PLAT (PLAT)?
- How To Buy BitKan (KAN)?
- How To Buy BitMoney (BIT)?
- How To Buy BitNautic Token (BTNT)?
- How To Buy Bitpark Coin (BPC)?
- How To Buy BitRent (RNTB)?
- How To Buy BitRewards (BIT)?
- How To Buy BitSend (BSD)?
- How To Buy BitShares (BTS)?
- How To Buy Bitsonic (BSC)?
- How To Buy Bitstar (BITS)?
- How To Buy Bitsten Token (BST)?
- How To Buy Bitswift (BITS)?
- How To Buy BitTorrent (BTT)?
- How To Buy BitTube (TUBE)?
- How To Buy Bittwatt (BWT)?
- How To Buy BitWhite (BTW)?
- How To Buy BIZKEY (BZKY)?
- How To Buy BlackCoin (BLK)?
- How To Buy BLOC.MONEY (BLOC)?
- How To Buy Blockburn (BURN)?
- How To Buy Blockcat (CAT)?
- How To Buy Blockchain Quotations Index Token (BQT)?
- How To Buy Blockcloud (BLOC)?
- How To Buy BLOCKIDCOIN (BID)?
- How To Buy BlockMason Credit Protocol (BCPT)?
- How To Buy Blocknet (BLOCK)?
- How To Buy BlockNoteX (BNOX)?
- How To Buy Blockparty (BOXX Token) (BOXX)?
- How To Buy Blockport (BPT)?
- How To Buy Blockstamp (BST)?
- How To Buy Blocktix (TIX)?
- How To Buy Blocktrade Token (BTT)?
- How To Buy BLOCKv (VEE)?
- How To Buy Blood (BLOOD)?
- How To Buy Bloom (BLT)?
- How To Buy Blox (CDT)?
- How To Buy Blue Baikal (BBC)?
- How To Buy Blue Whale EXchange (BWX)?
- How To Buy Bluzelle (BLZ)?
- How To Buy BnkToTheFuture (BFT)?
- How To Buy Bob's Repair (BOB)?
- How To Buy Boogle (BOO)?
- How To Buy Boolberry (BBR)?
- How To Buy BORA (BORA)?
- How To Buy BOSAGORA (BOA)?
- How To Buy BOScoin (BOS)?
- How To Buy BOSCore (BOS)?
- How To Buy Bottos (BTO)?
- How To Buy BowsCoin (BSC)?
- How To Buy BOX Token (BOX)?
- How To Buy Brazilian Digital Token (BRZ)?
- How To Buy Bread (BRD)?
- How To Buy Bread Token?
- How To Buy Breezecoin (BRZE)?
- How To Buy BriaCoin (BRIA)?
- How To Buy BrickBlock (BBK)?
- How To Buy BTCDOWN (BTCDOWN)?
- How To Buy BTCUP (BTCUP)?
- How To Buy BTSE (BTSE)?
- How To Buy BTU Protocol (BTU)?
- How To Buy Building Cities Beyond Blockchain (BCB)?
- How To Buy BUMO (BU)?
- How To Buy Burst (BURST)?
- How To Buy Business Credit Substitute (BCS)?
- How To Buy Buxcoin (BUX)?
- How To Buy BuySell (BULL)?
- How To Buy Buzzshow (GLDY)?
- How To Buy Byteball (GBYTE)?
- How To Buy Bytecoin (BCN)?
- How To Buy Bytom (BTM)?
- How To Buy C20 (C20)?
- How To Buy CaixaPay (CXP)?
- How To Buy Callisto Network (CLO)?
- How To Buy CannabisCoin (CANN)?
- How To Buy Cannadrix (CND)?
- How To Buy CanonChain (CZR)?
- How To Buy CanYaCoin (CAN)?
- How To Buy Cappasity (CAPP)?
- How To Buy Capricoin (CPS)?
- How To Buy Cardano?
- How To Buy Cardstack (CARD)?
- How To Buy Carebit (CARE)?
- How To Buy CargoX (CXO)?
- How To Buy Carry (CRE)?
- How To Buy Cartesi (CTSI)?
- How To Buy Cashbery Coin (CBC)?
- How To Buy Cashpayz Token (CPC)?
- How To Buy Casino Betting Coin (CBC)?
- How To Buy CEDEX Coin (CEDEX)?
- How To Buy Celer Network (CELR)?
- How To Buy Celeum (CLX)?
- How To Buy Celsius (CEL)?
- How To Buy ChainLink (LINK)?
- How To Buy Change (CAG)?
- How To Buy ChatCoin (CHAT)?
- How To Buy Chiliz (CHZ)?
- How To Buy Chromia (CHR)?
- How To Buy Chrono.tech (TIME)?
- How To Buy Chronobank (TIME)?
- How To Buy ChronoCoin (CRN)?
- How To Buy Cindicator (CND)?
- How To Buy Civic (CVC)?
- How To Buy Civic (CVC)?
- How To Buy Clams (CLAM)?
- How To Buy Clipper Coin (CCC)?
- How To Buy CloakCoin (CLOAK)?
- How To Buy Cloudbric (CLB)?
- How To Buy ClubCoin (CLUB)?
- How To Buy CLX?
- How To Buy CMITCOIN (CMIT)?
- How To Buy Cocos-BCX (COCOS)?
- How To Buy Cofound.it?
- How To Buy Coin Controller Cash (CCC)?
- How To Buy CoinHe Token (CHT)?
- How To Buy Coinlancer (CL)?
- How To Buy Coinsbit Token (CNB)?
- How To Buy CoinUs (CNUS)?
- How To Buy Color Platform (CLR)?
- How To Buy Comet (CMT)?
- How To Buy Commerce Data Connection (CDC)?
- How To Buy CommerceBlock (CBT)?
- How To Buy Compound (COMP)?
- How To Buy Compound Coin (COMP)?
- How To Buy Consensus (SEN)?
- How To Buy Consentium (CSM)?
- How To Buy Content and AD Network (CAN)?
- How To Buy Content Neutrality Network (CNN)?
- How To Buy Content Value Network (CVNT)?
- How To Buy ContentBox (BOX)?
- How To Buy Contentos (COS)?
- How To Buy CONUN (CON)?
- How To Buy Cortex (CTXC)?
- How To Buy Cosmo Coin (COSM)?
- How To Buy Cosmos (ATOM)?
- How To Buy COTI (COTI)?
- How To Buy Counterparty (XCP)?
- How To Buy CPChain (CPC)?
- How To Buy CREDIT (CREDIT)?
- How To Buy Credit Tag Chain (CTC)?
- How To Buy Creditcoin (CTC)?
- How To Buy Credits (CS)?
- How To Buy Crowd Machine (CMCT)?
- How To Buy CrowdWiz (WIZ)?
- How To Buy Crown (CRW)?
- How To Buy Cryptaur (CPT)?
- How To Buy Crypto.com (MCO)?
- How To Buy Crypto.com Coin (CRO)?
- How To Buy CryptoAds Marketplace (CRAD)?
- How To Buy CryptoBharatCoin (CBC)?
- How To Buy CryptoBossCoin (CBC)?
- How To Buy CryptoCarbon (CCRB)?
- How To Buy Cryptocean (CRON)?
- How To Buy CryptoEnergy (CNRG)?
- How To Buy Cryptonex (CNX)?
- How To Buy Cube (AUTO)?
- How To Buy Curecoin (CURE)?
- How To Buy CVCoin (CVN)?
- How To Buy CWV Chain (CWV)?
- How To Buy Cyber Movie Chain (CMCT)?
- How To Buy Cybereits (CRE)?
- How To Buy CyberMiles?
- How To Buy CyberVein (CVT)?
- How To Buy D Community (DILI)?
- How To Buy DACC (DACC)?
- How To Buy DAD (DAD)?
- How To Buy DAEX (DAX)?
- How To Buy DAOstack (GEN)?
- How To Buy Dapp Token (DAPPT)?
- How To Buy DAPS Coin (DAPS)?
- How To Buy Darcrus (DAR)?
- How To Buy Dash?
- How To Buy Dashcoin (DSH)?
- How To Buy DATA (DTA)?
- How To Buy Databroker (DTX)?
- How To Buy Datacoin (DTC)?
- How To Buy Datarius Credit (DTRC)?
- How To Buy Datawallet (DXT)?
- How To Buy Datum (DAT)?
- How To Buy DATx (DATX)?
- How To Buy DAV Coin (DAV)?
- How To Buy Davinci Coin (DAC)?
- How To Buy Dawn Protocol (DAWN)?
- How To Buy DDKoin (DDK)?
- How To Buy DEAPcoin (DEP)?
- How To Buy Decent?
- How To Buy DECENT (DCT)?
- How To Buy Decentraland (MANA)?
- How To Buy Decentralized Vulnerability Platform (DVP)?
- How To Buy Decred?
- How To Buy DeepBrain Chain (DBC)?
- How To Buy DEEX (DEEX)?
- How To Buy Delphy (DPY)?
- How To Buy Demeter Chain (DMTC)?
- How To Buy Dent (DENT)?
- How To Buy Dentacoin?
- How To Buy Dether (DTH)?
- How To Buy Dexter G (DXG)?
- How To Buy Diamond (DMD)?
- How To Buy DigiByte (DGB)?
- How To Buy DigiFinexToken (DFT)?
- How To Buy Digital Gold (GOLD)?
- How To Buy Digital Insurance Token (DIT)?
- How To Buy DigitalNote (XDN)?
- How To Buy DIGIX?
- How To Buy Digix Gold Token (DGX)?
- How To Buy DigixDAO (DGD)?
- How To Buy DIMCOIN (DIM)?
- How To Buy Dinastycoin (DCY)?
- How To Buy District0x?
- How To Buy Divi (DIVI)?
- How To Buy dKargo (DKA)?
- How To Buy DMarket (DMT)?
- How To Buy DMM: Governance (DMG)?
- How To Buy doc.com Token (MTC)?
- How To Buy DOCH COIN (DCH)?
- How To Buy Dock (DOCK)?
- How To Buy DoDreamChain (DRM)?
- How To Buy Dogecoin (DOGE)?
- How To Buy Dogecoin (DOGE)?
- How To Buy DopeCoin (DOPE)?
- How To Buy DraftCoin (DFT)?
- How To Buy Dragonchain (DRGN)?
- How To Buy Dreamcoin (DRM)?
- How To Buy DREP (DREP)?
- How To Buy DUO Network Token (DUO)?
- How To Buy Dusk Network (DUSK)?
- How To Buy DWS (DWS)?
- How To Buy DxChain Token (DX)?
- How To Buy Dynamic (DYN)?
- How To Buy e-Chat (ECHT)?
- How To Buy e-Gulden (EFL)?
- How To Buy Earneo (SNPC)?
- How To Buy eBoost (EBST)?
- How To Buy Echoin (EC)?
- How To Buy EchoLink (EKO)?
- How To Buy EDC Blockchain (EDC)?
- How To Buy EDC Blockchain [old] (EDC)?
- How To Buy Eden (EDN)?
- How To Buy Edge (DADI)?
- How To Buy Edgeless (EDG)?
- How To Buy Edgeless (EDG)?
- How To Buy Education Ecosystem (LEDU)?
- How To Buy EduCoin (EDU)?
- How To Buy Egretia (EGT)?
- How To Buy Einsteinium (EMC2)?
- How To Buy Elamachain (ELAMA)?
- How To Buy Elastos (ELA)?
- How To Buy Elcoin (EL)?
- How To Buy Electronic Energy Coin (E2C)?
- How To Buy Elementeum (ELET)?
- How To Buy Elrond (ERD)?
- How To Buy ELYSIA (EL)?
- How To Buy Elysian (ELY)?
- How To Buy Emercoin (EMC)?
- How To Buy Eminer (EM)?
- How To Buy En-Tan-Mo (ETM)?
- How To Buy EncrypGen (DNA)?
- How To Buy EncryptoTel (ETT)?
- How To Buy EncryptoTel [ETH] (ETT)?
- How To Buy Endor Protocol (EDR)?
- How To Buy Energi (NRG)?
- How To Buy Energo (TSL)?
- How To Buy Energycoin (ENRG)?
- How To Buy Enigma (ENG)?
- How To Buy Enjin Coin (ENJ)?
- How To Buy Envion (EVN)?
- How To Buy Enzo (NZO)?
- How To Buy EOS?
- How To Buy EOS Force (EOSC)?
- How To Buy eosDAC (EOSDAC)?
- How To Buy Equal (EQL)?
- How To Buy Eristica (ERT)?
- How To Buy eSDChain (SDA)?
- How To Buy Esports Token (EST)?
- How To Buy Essentia (ESS)?
- How To Buy Eterbase Coin (XBASE)?
- How To Buy Eternity (ENT)?
- How To Buy Ether Kingdoms Token (IMP)?
- How To Buy Ether Zero (ETZ)?
- How To Buy Ethereum?
- How To Buy Ethereum Classic (ETC)?
- How To Buy Ethereum Classic (ETC)?
- How To Buy EtherInc (ETI)?
- How To Buy Etheroll (DICE)?
- How To Buy Etherparty (FUEL)?
- How To Buy Ethos?
- How To Buy EURBASE (EBASE)?
- How To Buy EurocoinToken (ECTE)?
- How To Buy Evedo (EVED)?
- How To Buy EvenCoin (EVN)?
- How To Buy Everex (EVX)?
- How To Buy EverGreenCoin (EGC)?
- How To Buy Everipedia (IQ)?
- How To Buy EveriToken (EVT)?
- How To Buy Exchange Union (XUC)?
- How To Buy ExclusiveCoin (EXCL)?
- How To Buy EXMO Coin (EXM)?
- How To Buy Exosis (EXO)?
- How To Buy Expanse (EXP)?
- How To Buy Experience Token (EXT)?
- How To Buy Experty (EXY)?
- How To Buy FABRK (FAB)?
- How To Buy Factom (FCT)?
- How To Buy FairGame (FAIR)?
- How To Buy Fanaticos Cash (FCH)?
- How To Buy FansTime (FTI)?
- How To Buy FantasyGold (FGC)?
- How To Buy Fantom (FTM)?
- How To Buy Fantomcoin (FCN)?
- How To Buy FarmaTrust (FTT)?
- How To Buy Fast Access Blockchain (FAB)?
- How To Buy Feathercoin (FTC)?
- How To Buy Fetch.ai (FET)?
- How To Buy FIBOS (FO)?
- How To Buy Fiii (FIII)?
- How To Buy Filecoin [Futures] (FIL)?
- How To Buy FinexboxToken (FNB)?
- How To Buy Fire Lotto (FLOT)?
- How To Buy FirmaChain (FCT)?
- How To Buy First Bitcoin (BIT)?
- How To Buy FirstBlood?
- How To Buy FirstBlood (1ST)?
- How To Buy FLETA (FLETA)?
- How To Buy Flexacoin (FXC)?
- How To Buy FLIP (FLP)?
- How To Buy FLO (FLO)?
- How To Buy Flowchain (FLC)?
- How To Buy FNB Protocol (FNB)?
- How To Buy FOAM (FOAM)?
- How To Buy Fountain (FTN)?
- How To Buy FREE Coin (FREE)?
- How To Buy Freecash (FCH)?
- How To Buy FSBT API Token (FSBT)?
- How To Buy FTX Token (FTT)?
- How To Buy Function X (FX)?
- How To Buy FunFair?
- How To Buy Fusion (FSN)?
- How To Buy FuturoCoin (FTO)?
- How To Buy GAMB (GMB)?
- How To Buy Game Stars (GST)?
- How To Buy Game.com (GTC)?
- How To Buy GameCredits (GAME)?
- How To Buy GAPS (GAP)?
- How To Buy Gas (GAS)?
- How To Buy Gatechain Token (GT)?
- How To Buy Gemini Dollar (GUSD)?
- How To Buy Genaro Network (GNX)?
- How To Buy Gene Source Code Chain (GENE)?
- How To Buy GENE Token?
- How To Buy Genesis Vision (GVT)?
- How To Buy GeoCoin (GEO)?
- How To Buy GeoDB (GEO)?
- How To Buy GET Protocol (GET)?
- How To Buy Gexan (GEX)?
- How To Buy Gifto (GTO)?
- How To Buy Gleec (GLEEC)?
- How To Buy GlitzKoin (GTN)?
- How To Buy Global Game Coin (GGC)?
- How To Buy Global Social Chain (GSC)?
- How To Buy Globalvillage Ecosystem (GVE)?
- How To Buy GMB (GMB)?
- How To Buy Gnosis (GNO)?
- How To Buy GoChain (GO)?
- How To Buy GoldCoin (GLC)?
- How To Buy Golden Token (GOLD)?
- How To Buy GoldMint (MNTP)?
- How To Buy Golem (GNT)?
- How To Buy Golos?
- How To Buy Gomics (GOM)?
- How To Buy GoNetwork (GOT)?
- How To Buy Gosama (GOS)?
- How To Buy Grantcoin (GRT)?
- How To Buy GreenPower (GRN)?
- How To Buy GridCoin (GRC)?
- How To Buy Grin (GRIN)?
- How To Buy Groestlcoin (GRS)?
- How To Buy GSENetwork (GSE)?
- How To Buy Gstcoin (GST)?
- How To Buy Gulden (NLG)?
- How To Buy Guppy (GUP)?
- How To Buy GXChain (GXC)?
- How To Buy Handshake (HNS)?
- How To Buy Harmony (ONE)?
- How To Buy HarmonyCoin (HMC)?
- How To Buy HashCoin (HSC)?
- How To Buy Hashgard (GARD)?
- How To Buy HashNet BitEco (HNB)?
- How To Buy Haven Protocol (XHV)?
- How To Buy HBToken (HB)?
- How To Buy Hdac (HDAC)?
- How To Buy HeartBout (HB)?
- How To Buy HeartBout Pay (HP)?
- How To Buy Hedera Hashgraph (HBAR)?
- How To Buy HedgeTrade (HEDG)?
- How To Buy HempCoin (THC)?
- How To Buy HeroNode (HER)?
- How To Buy HEX (HEX)?
- How To Buy Hi Mutual Society (HMC)?
- How To Buy High Performance Blockchain (HPB)?
- How To Buy Hintchain (HINT)?
- How To Buy HitChain (HIT)?
- How To Buy Hive Blockchain (HIVE)?
- How To Buy HollyWoodCoin (HWC)?
- How To Buy Holo (HOT)?
- How To Buy Homeros (HMR)?
- How To Buy HOQU (HQX)?
- How To Buy Horizen (ZEN)?
- How To Buy HoryouToken (HYT)?
- How To Buy Howdoo (UDOO)?
- How To Buy Hshare?
- How To Buy Humaniq?
- How To Buy Humaniq (HMQ)?
- How To Buy Humanscape (HUM)?
- How To Buy Huobi Token (HT)?
- How To Buy Hxro (HXRO)?
- How To Buy Hybrid Block (HYB)?
- How To Buy HYCON (HYC)?
- How To Buy Hydro Protocol (HOT)?
- How To Buy Hydrogen (HYDRO)?
- How To Buy HyperCash (HC)?
- How To Buy HyperDAO (HDAO)?
- How To Buy Hyperion (HYN)?
- How To Buy I/O Coin (IOC)?
- How To Buy Icon?
- How To Buy Iconomi (ICO)?
- How To Buy iExec RLC (RLC)?
- How To Buy Ignis (IGNIS)?
- How To Buy IHT Real Estate Protocol (IHT)?
- How To Buy ILCoin (ILC)?
- How To Buy Imsmart (IMT)?
- How To Buy Incent (INCNT)?
- How To Buy Infinity Economics (XIN)?
- How To Buy Influence Chain (INC)?
- How To Buy Ink (INK)?
- How To Buy Ink Protocol (XNK)?
- How To Buy Insights Network (INSTAR)?
- How To Buy Insureum (ISR)?
- How To Buy INT Chain (INT)?
- How To Buy Intelligent Investment Chain (IIC)?
- How To Buy IntelliShare (INE)?
- How To Buy Internet of People (IOP)?
- How To Buy ioeX (IOEX)?
- How To Buy ION (ION)?
- How To Buy IONChain (IONC)?
- How To Buy IOStoken?
- How To Buy IoT Chain (ITC)?
- How To Buy IOTA (MIOTA)?
- How To Buy IoTeX (IOTX)?
- How To Buy IP Exchange (IPSX)?
- How To Buy IPChain (IPC)?
- How To Buy Iqcash (IQ)?
- How To Buy iQeon (IQN)?
- How To Buy IRISnet (IRIS)?
- How To Buy Isiklar Coin (ISIKC)?
- How To Buy iTicoin (ITI)?
- How To Buy Japan Content Token (JCT)?
- How To Buy Jetcoin (JET)?
- How To Buy Jewel (JWL)?
- How To Buy Jibrel Network (JNT)?
- How To Buy Jobchain (JOB)?
- How To Buy JUST (JST)?
- How To Buy Kambria (KAT)?
- How To Buy KardiaChain (KAI)?
- How To Buy Kava (KAVA)?
- How To Buy Kcash (KCASH)?
- How To Buy KEY (KEY)?
- How To Buy KickToken (KICK)?
- How To Buy Kin (KIN)?
- How To Buy King DAG (KDAG)?
- How To Buy Klaytn (KLAY)?
- How To Buy Kleros (PNK)?
- How To Buy Komodo?
- How To Buy Kuende (KUE)?
- How To Buy Kusama (KSM)?
- How To Buy Kyber Network (KNC)?
- How To Buy Lambda (LAMB)?
- How To Buy Lampix (PIX)?
- How To Buy Largo Coin (LRG)?
- How To Buy Latamcash (LMCH)?
- How To Buy LAToken (LA)?
- How To Buy LBK (LBK)?
- How To Buy LBRY Credits (LBC)?
- How To Buy LegalBlock (LBK)?
- How To Buy Level Up Coin (LUC)?
- How To Buy Level01 (LVX)?
- How To Buy Leverj (LEV)?
- How To Buy Libra Credit (LBA)?
- How To Buy Lightning Bitcoin (LBTC)?
- How To Buy Lina (LINA)?
- How To Buy LinkEye (LET)?
- How To Buy Liquidity Network (LQD)?
- How To Buy Lisk (LSK)?
- How To Buy Lisk (LSK)?
- How To Buy Lisk Machine Learning (LML)?
- How To Buy LiteBitcoin (LBTC)?
- How To Buy Litecoin?
- How To Buy Litecoin Cash (LCC)?
- How To Buy LiteCoin Ultra (LTCU)?
- How To Buy Litex (LXT)?
- How To Buy Lition (LIT)?
- How To Buy LNX Protocol (LNX)?
- How To Buy Lobstex (LOBS)?
- How To Buy Loom Network (LOOM)?
- How To Buy Loopring?
- How To Buy LTO Network (LTO)?
- How To Buy LUCY (LUCY)?
- How To Buy Luna Coin (LUNA)?
- How To Buy Lunyr?
- How To Buy Lympo (LYM)?
- How To Buy Machine Xchange Coin (MXC)?
- How To Buy Maecenas (ART)?
- How To Buy Maggie (MAG)?
- How To Buy MaidSafeCoin (MAID)?
- How To Buy Maincoin (MNC)?
- How To Buy Mainframe (MFT)?
- How To Buy Mainstream For The Underground (MFTU)?
- How To Buy Maker (MKR)?
- How To Buy Mallcoin (MLC)?
- How To Buy MARK.SPACE (MRK)?
- How To Buy MarketPeak (PEAK)?
- How To Buy Matchpool (GUP)?
- How To Buy Matic Network (MATIC)?
- How To Buy Matrix AI Network (MAN)?
- How To Buy Maximine Coin (MXM)?
- How To Buy Mchain (MAR)?
- How To Buy Measurable Data Token (MDT)?
- How To Buy MeconCash (MCH)?
- How To Buy Medibloc (MED)?
- How To Buy Medicalchain (MTN)?
- How To Buy MedicCoin (MEDIC)?
- How To Buy Melon (MLN)?
- How To Buy Memetic (MEME)?
- How To Buy Menlo One (ONE)?
- How To Buy Merculet (MVP)?
- How To Buy Mercury (MER)?
- How To Buy MergeCoin (MGC)?
- How To Buy MesChain (MES)?
- How To Buy MESG (MESG)?
- How To Buy Meta (MTA)?
- How To Buy Metadium (META)?
- How To Buy MetaHash (MHC)?
- How To Buy Metal?
- How To Buy Metaverse (ETP)?
- How To Buy Metaverse Dualchain Network Architecture (DNA)?
- How To Buy Meter (MTRG)?
- How To Buy Metrix Coin (MRX)?
- How To Buy Metronome (MET)?
- How To Buy MEX (MEX)?
- How To Buy MicroMoney (AMM)?
- How To Buy MidasProtocol (MAS)?
- How To Buy MimbleWimbleCoin (MWC)?
- How To Buy Mindexcoin (MIC)?
- How To Buy MINDOL (MIN)?
- How To Buy MineBee (MB)?
- How To Buy MIR COIN (MIR)?
- How To Buy Mithril (MITH)?
- How To Buy Mixin (XIN)?
- How To Buy MixMarvel (MIX)?
- How To Buy MobileCash (MBL)?
- How To Buy MobileGo (MGO)?
- How To Buy Mobius (MOBI)?
- How To Buy MoCo Token (MoCo)?
- How To Buy Moeda Loyalty Points (MDA)?
- How To Buy Mogu (MOGX)?
- How To Buy Moin (MOIN)?
- How To Buy Molecular Future (MOF)?
- How To Buy Monaco?
- How To Buy MonaCoin (MONA)?
- How To Buy Monarch (MT)?
- How To Buy Monero (XMR)?
- How To Buy Monero (XMR)?
- How To Buy Monero Original?
- How To Buy MoneroV (XMV)?
- How To Buy MonetaryUnit (MUE)?
- How To Buy Monetha (MTH)?
- How To Buy Moneynet (MNC)?
- How To Buy Moneytoken (IMT)?
- How To Buy Monolith (TKN)?
- How To Buy More Coin (MORE)?
- How To Buy Moss Coin (MOC)?
- How To Buy MTC Mesh Network (MTC)?
- How To Buy Multi-collateral DAI (DAI)?
- How To Buy MultiVAC (MTV)?
- How To Buy MX Token (MX)?
- How To Buy MXC (MXC)?
- How To Buy Myriad (XMY)?
- How To Buy Mysterium?
- How To Buy MyToken (MT)?
- How To Buy NAGA?
- How To Buy NAGA (NGC)?
- How To Buy Nano (NANO)?
- How To Buy Nasdacoin (NSD)?
- How To Buy NativeCoin (N8V)?
- How To Buy NAV Coin (NAV)?
- How To Buy NDN Link (NDN)?
- How To Buy Neblio (NEBL)?
- How To Buy Nebulas Token (NAS)?
- How To Buy Nectar (NEC)?
- How To Buy NEM (XEM)?
- How To Buy NEO?
- How To Buy NeoWorld Cash (NASH)?
- How To Buy Nervos Network (CKB)?
- How To Buy NEST Protocol (NEST)?
- How To Buy Nestree (EGG)?
- How To Buy Netbox Coin (NBX)?
- How To Buy Neumark (NEU)?
- How To Buy NewsToken (NEWOS)?
- How To Buy NEXO?
- How To Buy Next (NXT)?
- How To Buy NextDAO (NAX)?
- How To Buy Nexty (NTY)?
- How To Buy Nexus (NXS)?
- How To Buy Nexxo (NEXXO)?
- How To Buy Nimiq (NIM)?
- How To Buy NKN (NKN)?
- How To Buy No BS Crypto (NOBS)?
- How To Buy NOAH?
- How To Buy NOIA Network (NOIA)?
- How To Buy NOIZchain (NOIZ)?
- How To Buy NoLimitCoin (NLC2)?
- How To Buy NOVA (NOVA)?
- How To Buy Novacoin?
- How To Buy NPCoin (NPC)?
- How To Buy NSS Coin (NSS)?
- How To Buy NuBits (NBT)?
- How To Buy Nucleus Vision (NCASH)?
- How To Buy Nuls (NULS)?
- How To Buy Numeraire?
- How To Buy NuShares (NSR)?
- How To Buy Oath Protocol (OATH)?
- How To Buy Observer (OBSR)?
- How To Buy Obyte (GBYTE)?
- How To Buy Ocean Protocol (OCEAN)?
- How To Buy Octoin Coin (OCC)?
- How To Buy ODUWA (OWC)?
- How To Buy Odyssey (OCN)?
- How To Buy OFCOIN (OF)?
- How To Buy OKB (OKB)?
- How To Buy OKCash (OK)?
- How To Buy Olive (OLE)?
- How To Buy OMG Network (OMG)?
- How To Buy OmiseGo (OMG)?
- How To Buy Omni (OMNI)?
- How To Buy Omnitude (ECOM)?
- How To Buy On.Live (ONL)?
- How To Buy OneLedger (OLT)?
- How To Buy OneRoot Network (RNT)?
- How To Buy ONOToken (ONOT)?
- How To Buy Ontology (ONT)?
- How To Buy Ontology Gas (ONG)?
- How To Buy OpenAnx (OAX)?
- How To Buy OptiToken (OPTI)?
- How To Buy Orbs (ORBS)?
- How To Buy Orchid (OXT)?
- How To Buy Orient Walt (HTDF)?
- How To Buy Origin Protocol (OGN)?
- How To Buy Origin Sport (ORS)?
- How To Buy OriginTrail (TRAC)?
- How To Buy ORS Group (ORS)?
- How To Buy OSA Token (OSA)?
- How To Buy ost (OST)?
- How To Buy Ouroboros (OURO)?
- How To Buy Oxycoin (OXY)?
- How To Buy Pal Network (PAL)?
- How To Buy PANTHEON X (XPN)?
- How To Buy ParallelCoin (DUO)?
- How To Buy ParkByte (PKB)?
- How To Buy Parkgene (GENE)?
- How To Buy ParkinGo (GOT)?
- How To Buy Part?
- How To Buy Particl (PART)?
- How To Buy PATHHIVE (PHV)?
- How To Buy Patientory?
- How To Buy Patientory (PTOY)?
- How To Buy Patron (PAT)?
- How To Buy PAX Gold (PAXG)?
- How To Buy Paxos Standard (PAX)?
- How To Buy PAYCENT (PYN)?
- How To Buy Paypex (PAYX)?
- How To Buy PayProtocol (PCI)?
- How To Buy Paytomat (PTI)?
- How To Buy PCHAIN (PI)?
- How To Buy Peercoin?
- How To Buy Penta (PNT)?
- How To Buy Perlin (PERL)?
- How To Buy Pesetacoin (PTC)?
- How To Buy PhoenixDAO (PHNX)?
- How To Buy PIBBLE (PIB)?
- How To Buy PinkCoin (PINK)?
- How To Buy Pirl (PIRL)?
- How To Buy PIVX?
- How To Buy Plair (PLA)?
- How To Buy Plancoin (PLAN)?
- How To Buy PLANET (PLA)?
- How To Buy PLATINCOIN (PLC)?
- How To Buy PlatonCoin (PLTC)?
- How To Buy PlayChip (PLA)?
- How To Buy PlayCoin [ERC20] (PLX)?
- How To Buy PlayFuel (PLF)?
- How To Buy PlayGame (PXG)?
- How To Buy Playgroundz (IOG)?
- How To Buy Pledge Coin (PLG)?
- How To Buy pNetwork (PNT)?
- How To Buy Po.et (POE)?
- How To Buy POA (POA)?
- How To Buy Polkadot [IOU] (DOT)?
- How To Buy Polymath?
- How To Buy POPCHAIN (PCH)?
- How To Buy Populos?
- How To Buy Populous (PPT)?
- How To Buy Poseidon Network (QQQ)?
- How To Buy PotCoin (POT)?
- How To Buy Power Ledger?
- How To Buy PRASM (PSM)?
- How To Buy Precium (PCM)?
- How To Buy Primas (PST)?
- How To Buy PRIZM (PZM)?
- How To Buy ProChain (PRA)?
- How To Buy Profile Utility Token (PUT)?
- How To Buy Project Pai (PAI)?
- How To Buy Project WITH (WIKEN)?
- How To Buy Prometeus (PROM)?
- How To Buy Proton (XPR)?
- How To Buy Proton Token (PTT)?
- How To Buy PTON (PTON)?
- How To Buy PumaPay (PMA)?
- How To Buy Pundi X (NPXS)?
- How To Buy Pundi X NEM (NPXSXEM)?
- How To Buy PutinCoin (PUT)?
- How To Buy Q DAO Governance token v1.0 (QDAO)?
- How To Buy QASH (QASH)?
- How To Buy Qbao (QBT)?
- How To Buy Qbic (QBIC)?
- How To Buy QLC Chain (QLC)?
- How To Buy Qtum?
- How To Buy Qtum (QTUM)?
- How To Buy QuadrantProtocol (EQUAD)?
- How To Buy Quant (QNT)?
- How To Buy Quantstamp (QSP)?
- How To Buy Quantum Resistant Ledger (QRL)?
- How To Buy QuarkChain (QKC)?
- How To Buy QuazarCoin (QCN)?
- How To Buy QUEENBEE (QBZ)?
- How To Buy Quiztok (QTCON)?
- How To Buy QunQun (QUN)?
- How To Buy QURAS (XQC)?
- How To Buy QUSD (QUSD)?
- How To Buy Radium (RADS)?
- How To Buy Raiden Network Token (RDN)?
- How To Buy RAKUN (RAKU)?
- How To Buy Rate3 (RTE)?
- How To Buy Ratecoin (XRA)?
- How To Buy Ravencoin (RVN)?
- How To Buy Ravencoin Classic (RVC)?
- How To Buy RChain (REV)?
- How To Buy Read (READ)?
- How To Buy RealChain (RCT)?
- How To Buy RED (RED)?
- How To Buy Red Pulse (PHX)?
- How To Buy Refereum (RFR)?
- How To Buy RefToken (REF)?
- How To Buy Regalcoin (REC)?
- How To Buy Remme (REM)?
- How To Buy Ren (REN)?
- How To Buy Request (REQ)?
- How To Buy Reserve Rights (RSR)?
- How To Buy Revain (REV)?
- How To Buy RightMesh (RMESH)?
- How To Buy Rimbit (RBT)?
- How To Buy RING X PLATFORM (RINGX)?
- How To Buy Ripio Credit Network?
- How To Buy Ripple (XRP)?
- How To Buy Rise (RISE)?
- How To Buy Rivetz (RVT)?
- How To Buy RLC iEx.ec (RLC)?
- How To Buy ROAD (ROAD)?
- How To Buy Robonomics.network (XRT)?
- How To Buy ROMToken (ROM)?
- How To Buy ROOBEE (ROOBEE)?
- How To Buy RSK Infrastructure Framework (RIF)?
- How To Buy RSK Smart Bitcoin (RBTC)?
- How To Buy Rubycoin (RBY)?
- How To Buy Ruff (RUFF)?
- How To Buy Rupiah Token (IDRT)?
- How To Buy Salt?
- How To Buy SaluS (SLS)?
- How To Buy Santiment Network Token (SAN)?
- How To Buy Scorum Coins (SCR)?
- How To Buy Scry.info (DDD)?
- How To Buy Seal Network (SEAL)?
- How To Buy SEER (SEER)?
- How To Buy Selfkey (KEY)?
- How To Buy Selfpay (SXP)?
- How To Buy SelfSell (SSC)?
- How To Buy Sense (SENSE)?
- How To Buy Sentinel Protocol (UPP)?
- How To Buy SESSIA (KICKS)?
- How To Buy ShareToken (SHR)?
- How To Buy Sharpay (S)?
- How To Buy Shift (SHIFT)?
- How To Buy SiaCashCoin (SCC)?
- How To Buy Siacoin (SC)?
- How To Buy SIBCoin (SIB)?
- How To Buy Simmitri (SIM)?
- How To Buy SINERGIA (SNG)?
- How To Buy SingularDTV (SNGLS)?
- How To Buy SingularityNET (AGI)?
- How To Buy SIRIN LABS Token (SRN)?
- How To Buy SIX (SIX)?
- How To Buy Skrumble Network (SKM)?
- How To Buy Skycoin (SKY)?
- How To Buy SmartCash?
- How To Buy Smartlands (SLT)?
- How To Buy SmartMesh (SMT)?
- How To Buy Smartshare (SSP)?
- How To Buy SNGLS?
- How To Buy Snovian.Space (SNOV)?
- How To Buy Social Activity Token (SAT)?
- How To Buy Social Lending Token (SLT)?
- How To Buy Soda Coin (SOC)?
- How To Buy Solana (SOL)?
- How To Buy SolarCoin (SLR)?
- How To Buy Sologenic (SOLO)?
- How To Buy SOLVE (SOLVE)?
- How To Buy Sonm?
- How To Buy SoPay (SOP)?
- How To Buy SpaceChain (SPC)?
- How To Buy SpankChain (SPANK)?
- How To Buy Sparkle (SPRKL)?
- How To Buy SparksPay (SPK)?
- How To Buy Sparkster (SPRK)?
- How To Buy Spectre.ai Utility Token (SXUT)?
- How To Buy Spendcoin (SPND)?
- How To Buy Sphere (SPHR)?
- How To Buy SPIN Protocol (SPIN)?
- How To Buy SPINDLE (SPD)?
- How To Buy StableUSD (USDS)?
- How To Buy StakeCubeCoin (SCC)?
- How To Buy Standard Tokenization Protocol (STPT)?
- How To Buy StarChain (STC)?
- How To Buy StarCoin (KST)?
- How To Buy Startcoin (START)?
- How To Buy Status (SNT)?
- How To Buy Status Network Token (SNT)?
- How To Buy Stealth (XST)?
- How To Buy Steem?
- How To Buy Steem Dollars (SBD)?
- How To Buy Stellar?
- How To Buy STEM CELL COIN (SCC)?
- How To Buy Stipend (SPD)?
- How To Buy StockChain (SCC)?
- How To Buy Storeum (STO)?
- How To Buy Storiqa (STQ)?
- How To Buy Storj?
- How To Buy StormX (STMX)?
- How To Buy Stox?
- How To Buy Stratis (STRAT)?
- How To Buy Streamit Coin (STREAM)?
- How To Buy Streamity (STM)?
- How To Buy Streamr (DATA)?
- How To Buy Stress (STS)?
- How To Buy Substratum (SUB)?
- How To Buy Sudan Gold Coin (SGC)?
- How To Buy Sun token (SUN)?
- How To Buy Suncontract (SNC)?
- How To Buy Super Bitcoin (SBTC)?
- How To Buy Super Zero Protocol (SERO)?
- How To Buy SuperEdge (ECT)?
- How To Buy sUSD (SUSD)?
- How To Buy suterusu (SUTER)?
- How To Buy Swace (SWACE)?
- How To Buy Swarm (SWM)?
- How To Buy Swarm City (SWT)?
- How To Buy SwftCoin (SWFTC)?
- How To Buy SwiftCash (SWIFT)?
- How To Buy Switcheo (SWTH)?
- How To Buy SymVerse (SYM)?
- How To Buy SyncFab (MFG)?
- How To Buy Synereo (AMP)?
- How To Buy Synergy (SNRG)?
- How To Buy Synthetix Network Token (SNX)?
- How To Buy Syscoin?
- How To Buy T.OS (TOSC)?
- How To Buy Tachyon Protocol (IPX)?
- How To Buy Tael (WABI)?
- How To Buy Taklimakan Network (TAN)?
- How To Buy Tap (XTP)?
- How To Buy TAXI Token (TAXI)?
- How To Buy Tchain (TCH)?
- How To Buy TE-FOOD (TFD)?
- How To Buy Telcoin (TEL)?
- How To Buy Tellor (TRB)?
- How To Buy Telos (TLOS)?
- How To Buy TEMCO (TEMCO)?
- How To Buy TENA (TENA)?
- How To Buy TenX (Pay)?
- How To Buy TenX (PAY)?
- How To Buy Tepleton (TEP)?
- How To Buy TeraCoin (TERA)?
- How To Buy Ternio (TERN)?
- How To Buy Terra (LUNA)?
- How To Buy Terra KRW (KRT)?
- How To Buy Terracoin (TRC)?
- How To Buy Tether?
- How To Buy Tether (USDT)?
- How To Buy Tezos (XTZ)?
- How To Buy The Abyss?
- How To Buy The Currency Analytics (TCAT)?
- How To Buy The Force Protocol (FOR)?
- How To Buy The Midas Touch Gold (TMTG)?
- How To Buy The Transfer Token (TTT)?
- How To Buy THEKEY (TKY)?
- How To Buy Themis (GET)?
- How To Buy THETA (THETA)?
- How To Buy Theta Fuel (TFUEL)?
- How To Buy Thingschain (TIC)?
- How To Buy Thore Cash (TCH)?
- How To Buy Thrive Token (THRT)?
- How To Buy Tierion (TNT)?
- How To Buy Ties.DB (TIE)?
- How To Buy TigerCash (TCH)?
- How To Buy Tigereum (TIG)?
- How To Buy Time New Bank (TNB)?
- How To Buy Titanium Blockchain (BAR)?
- How To Buy TNC Coin (TNC)?
- How To Buy TokenCard?
- How To Buy TokenClub (TCT)?
- How To Buy Tokenomy (TEN)?
- How To Buy Tokenpay (TPAY)?
- How To Buy TomoChain (TOMO)?
- How To Buy TopChain (TOPC)?
- How To Buy Traceability Chain (TAC)?
- How To Buy Transcodium (TNS)?
- How To Buy TransferCoin (TX)?
- How To Buy Travelflex (TRF)?
- How To Buy Treecle (TRCL)?
- How To Buy Trinity Network Credit (TNC)?
- How To Buy Tripio (TRIO)?
- How To Buy Tron?
- How To Buy TROY (TROY)?
- How To Buy True USD (TUSD)?
- How To Buy TrueChain (TRUE)?
- How To Buy Truegame (TGAME)?
- How To Buy Trustcoin (TRST)?
- How To Buy TrustSwap (SWAP)?
- How To Buy TrustVerse (TRV)?
- How To Buy TTC Protocol (TTC)?
- How To Buy Tutor's Diary (TUDA)?
- How To Buy U Network (UUU)?
- How To Buy U.CASH (UCASH)?
- How To Buy Ubex (UBEX)?
- How To Buy Ubiq (UBQ)?
- How To Buy Ubique Chain Of Things (UCT)?
- How To Buy Ulord (UT)?
- How To Buy Ultiledger (ULT)?
- How To Buy Ultimate Secure Cash (USC)?
- How To Buy Ultra (UOS)?
- How To Buy UMA (UMA)?
- How To Buy UNI COIN (UNI)?
- How To Buy Unibright (UBT)?
- How To Buy UNICORN Token (UNI)?
- How To Buy Unification (FUND)?
- How To Buy Unikoin Gold (UKG)?
- How To Buy United Bitcoin (UBTC)?
- How To Buy United Bull Traders (UNB)?
- How To Buy Universal Protocol Token (UPT)?
- How To Buy Universe (UNI)?
- How To Buy UnlimitedIP (UIP)?
- How To Buy Unobtanium (UNO)?
- How To Buy UNUS SED LEO (LEO)?
- How To Buy UOS Network (UOS)?
- How To Buy Upfiring (UFR)?
- How To Buy UpToken (UP)?
- How To Buy Uquid Coin (UQC)?
- How To Buy Uranus (URAC)?
- How To Buy USDA (USDA)?
- How To Buy USDCoin (USDC)?
- How To Buy USDK (USDK)?
- How To Buy USDQ (USDQ)?
- How To Buy UTRUST (UTK)?
- How To Buy V Systems (VSYS)?
- How To Buy Valor Token (VALOR)?
- How To Buy Vanywhere (VANY)?
- How To Buy VeChain?
- How To Buy Velas (VLX)?
- How To Buy VENA (VENA)?
- How To Buy Verasity (VRA)?
- How To Buy Verge?
- How To Buy VeriBlock (VBK)?
- How To Buy VeriCoin (VRC)?
- How To Buy VeriumReserve (VRM)?
- How To Buy Version (V)?
- How To Buy Vertcoin (VTC)?
- How To Buy VestChain (VEST)?
- How To Buy VeThor Token (VTHO)?
- How To Buy Vetri (VLD)?
- How To Buy Vexanium (VEX)?
- How To Buy Viacoin (VIA)?
- How To Buy VIBE (VIBE)?
- How To Buy Viberate?
- How To Buy VideoCoin (VID)?
- How To Buy VIDY (VIDY)?
- How To Buy VINchain (VIN)?
- How To Buy Vinci (VINCI)?
- How To Buy VITE (VITE)?
- How To Buy VNT Chain (VNT)?
- How To Buy Vodi X (VDX)?
- How To Buy Vollar (VOLLAR)?
- How To Buy Volt (ACDC)?
- How To Buy Voyager Token (VGX)?
- How To Buy W Green Pay (WGP)?
- How To Buy WABnetwork (WAB)?
- How To Buy Waletoken (WTN)?
- How To Buy Wallet Plus X (WPX)?
- How To Buy Walton (WTC)?
- How To Buy Waltonchain?
- How To Buy Wanchain (WAN)?
- How To Buy Wand Token (WAND)?
- How To Buy wave edu coin (WEC)?
- How To Buy Waves?
- How To Buy WAX?
- How To Buy WAXP (WAXP)?
- How To Buy WaykiChain (WICC)?
- How To Buy WaykiChain Governance Coin (WGRT)?
- How To Buy WazirX (WRX)?
- How To Buy WePower (WPR)?
- How To Buy WeShow Token (WET)?
- How To Buy WeTrust (TRST)?
- How To Buy WhiteCoin (XWC)?
- How To Buy Winco (WCO)?
- How To Buy Wings (WINGS)?
- How To Buy Wings DAO (WINGS)?
- How To Buy WINk (WIN)?
- How To Buy WinStars.live (WNL)?
- How To Buy Wirex Token (WXT)?
- How To Buy Wisdom Chain (WDC)?
- How To Buy Wixlar (WIX)?
- How To Buy WIZBL (WBL)?
- How To Buy WOLLO (WLO)?
- How To Buy WOM Protocol (WOM)?
- How To Buy Worldcore (WRC)?
- How To Buy Wowbit (WWB)?
- How To Buy WPP TOKEN (WPP)?
- How To Buy Wrapped Bitcoin (WBTC)?
- How To Buy Xaurum?
- How To Buy Xchange (XCG)?
- How To Buy XEL (XEL)?
- How To Buy Xenoverse (XENO)?
- How To Buy Xensor (XSR)?
- How To Buy XinFin Network (XDCE)?
- How To Buy XMCT (XMCT)?
- How To Buy Xriba (XRA)?
- How To Buy XRP (XRP)?
- How To Buy Xtock (XTX)?
- How To Buy XYO (XYO)?
- How To Buy Yap Stone (YAP)?
- How To Buy yearn.finance (YFI)?
- How To Buy Yee (YEE)?
- How To Buy Yobit Token (YO)?
- How To Buy Yocoin (YOC)?
- How To Buy YOU COIN (YOU)?
- How To Buy YOYOW (YOYOW)?
- How To Buy Zap?
- How To Buy Zcash?
- How To Buy Zcash (ZEC)?
- How To Buy Zclassic (ZCL)?
- How To Buy ZCoin (XZC)?
- How To Buy Zeepin (ZPT)?
- How To Buy Zel (ZEL)?
- How To Buy Zelwin (ZLW)?
- How To Buy Zencash?
- How To Buy ZenGold (ZENGOLD)?
- How To Buy ZethrDividendCard (ZDC)?
- How To Buy Zeusshield (ZSC)?
- How To Buy Zilliqa?
- How To Buy ZIP (ZIP)?
- How To Buy Zper (ZPR)?
- How To Buy Zynecoin (ZYN)?
-
...+ See all Cryptos
Sorted Per Exchange
- How To Buy On 1BTCXE?
- How To Buy On Allcoin?
- How To Buy On ANXPRO?
- How To Buy On B2BX?
- How To Buy On BCEX?
-
...+ See all Exchanges
- How To Buy On Bibox?
- How To Buy On Binance?
- How To Buy On Bitbank?
- How To Buy On Bitfinex?
- How To Buy On bitFlyer?
- How To Buy On BitForex?
- How To Buy On Bithumb?
- How To Buy On BitInka?
- How To Buy On BitMEX?
- How To Buy On Bits Blockchain?
- How To Buy On Bitstamp?
- How To Buy On Bittrex?
- How To Buy On BTC-Alpha?
- How To Buy On BTCBOX?
- How To Buy On BTCTrade?
- How To Buy On BTCX?
- How To Buy On CEX.io?
- How To Buy On Changelly?
- How To Buy On Coinbase?
- How To Buy On Coinegg?
- How To Buy On CoinEx?
- How To Buy On Coinfloor?
- How To Buy On CoinFlux?
- How To Buy On Coinone?
- How To Buy On CoinsBank?
- How To Buy On Coinsuper?
- How To Buy On CoinTiger?
- How To Buy On DigiFinex?
- How To Buy On Dragonex?
- How To Buy On EXMO?
- How To Buy On Exrates?
- How To Buy On Fisco?
- How To Buy On gate.io?
- How To Buy On GDAX (CoinBase Pro)?
- How To Buy On Gemini?
- How To Buy On GetBTC?
- How To Buy On GetBTC (FIAT to BTC)?
- How To Buy On HADAX?
- How To Buy On HitBTC?
- How To Buy On Huobi?
- How To Buy On Indacoin?
- How To Buy On Independent Reserve?
- How To Buy On itBit?
- How To Buy On Kraken?
- How To Buy On KuCoin?
- How To Buy On LBank?
- How To Buy On Lykke?
- How To Buy On MixCoins?
- How To Buy On OKCoin?
- How To Buy On OKEx?
- How To Buy On OOOBTC?
- How To Buy On Poloniex?
- How To Buy On Qryptos?
- How To Buy On Quoinex?
- How To Buy On RightBTC?
- How To Buy On SouthXchange?
- How To Buy On TOPBTC?
- How To Buy On Upbit?
- How To Buy On WEX?
- How To Buy On xBTCe?
- How To Buy On YoBit?
Trading and investing in digital assets is highly speculative and comes with many risks. The analysis/stats on CoinCheckup.com and it’s subsites are for informational purposes and should not be considered investment advice and or the truth. Statements and financial information on CoinCheckup.com and it’s subsites should not be construed as an endorsement or recommendation to buy, sell or hold.
Please do your own research on all of your investments carefully. Scores are based on averages of third party websites. Past performance is no indicative of future results. Read the full disclaimer here.
About | The #1 Crypto Security Guide| Blog | Contact | Advertising | Roadmap | Disclaimer | Privacy policy | Cookies policy
Copyright © 2017-2018 CoinCheckup.com